Wednesday, November 30, 2011

Elf on the {book} Shelf

Last year I got caught up in the Elf on the Shelf hype {how do you NOT get caught up in Christmas magic when you teach kindergarten?!} and wound up with our new friend, Mistletoe. He watched the kids last year and reported back to Santa but other than listening to whispered five year old secrets, he didn't have much participation in class.

I decided to beef it up this year by building on this student interest and making him a writing topic. This is only a sample because it's what I created after reading the book on Monday afternoon. I swear, I get more and better ideas in the last possible second than I do from hours of pre-planning!


You can get the rest of the Elf on the Shelf packet for more journal pages and activities, which has graphics to fit boy AND girl elves!  ;)

Sometimes it's hard to find a lot of new places to hide him in the classroom because he has to be high enough that the doubters can't touch him but in a place sturdy enough that he won't fall down. Pinterest has some fab ideas for those of you wanting to start this tradition at home, but where are your classroom elves landing when they come back from the North Pole each night? Here's a few ideas to get you started!
{high up places where he can see everyone}
{with favorite classroom characters}
{places the kids often look}
{hanging around somewhere unexpected!}

Saturday, November 19, 2011

pilgrims & native americans.

We've been talking turkey the past week or so but with a short week ahead it only makes sense to theme it up, right?!  :)  Monday we will become Pilgrims & Tuesday we'll be Native Americans.  If you'd like to participate {or just pick and choose a few items} here are some of the things we'll be doing as we work toward our long holiday weekend!

{pilgrims}
I don't know how I taught Thanksgiving before finding these books.  With vocab galore they have photographs to depict the time, tell the story from a child's perspective and help my five year olds really get into character.  If you do not own them, stop what you're doing and go make a purchase. Seriously...Google is your friend. And I wouldn't be if I didn't require you to get them. Off you go.


I found these pictures somewhere on the internet but I thought it was a great writing and vocabulary activity for my students so I put the pictures into a Word document for a labeling activity!  Don't worry teachers...answers included.  ;)

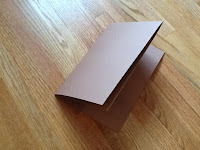
To dress the part you have to have authentic {construction paper} headgear, right?!  My helper and I created a step-by-step guide.  Start with a full sheet of white for the ladies.  Fold it in half hamburger style and cut out one of the corners.  When you open it up, fold back the long side {this will frame the face}.
Take the back corners and staple them to each side corner.  The staples will be at the bottom of the back of the bonnet.  Voila!  Hole punch each front side to attach yarn and tie under little pilgrim chins.

For the gents, start with a full sheet of black.  {I only had brown at home this morning!}  Fold it in half  hamburger style twice.

Start cutting over on the open side {on the right in the above picture} then slant up toward the top folds.

When you open it up, you should have a hat like this. Staple either side of their little pilgrim heads to ensure a nice snug fit!
I also give the boys a piece of yellow paper to cut a buckle and glue on to their hats.

Is any holiday ever complete without Charlie Brown?!  Watch it on YouTube to see the Peanuts characters' voyage to America. 

{native americans}
I hope you still have that bookstore browser open...because here's another great one by Kate Waters!

I believe these pictures were given to me by my children's art professor when I was student teaching so I can't give credit as to where they came from, but they're too good not to share!  Students can copy them into a journal, use them to write a rebus story or draw them on paperbag vests.
The vests {while cute} drive me a little bonkers because the kids never want to wear them for more than 30 seconds and it takes me forever to cut out the pieces to get them prepped.  So I've gotten away from those and we add these symbols to our Native American headdresses, which are....you guessed it...sentence strips with feathers glued to the back.  :)  We usually use real feathers but if you don't have any, just cut apart any feather coloring sheet and let the kids design their own!

{1st Thanksgiving}
I created this vocabulary journal for use in a writing center or as a whole group activity.  If you don't want to print out individual copies, you could also do it whole group on the SmartBoard.  If you don't have that luxury, I did make half pages to help cut down on your copies!  There's a word bank at the end to choose from and instead of one large blank there's one small blank per letter to make it a little easier to figure out.
This Venn diagram allows your children to compare Thanksgiving foods from the first feast to theirs today.  I like seeing the different foods that my students eat based on their family traditions and cultures so not all diagrams will be the same!  My kids always love to learn that they ate popcorn at the first Thanksgiving but aren't so enthused to hear about the oysters and mussels or venison!

P.S. If you like these adorable graphics from {Lettering Delights} sign up for their newsletter to get 9 free fonts!  {They won't bombard your inbox but you'll get emails about sales and new products.}

I hope you all have a blessed Thanksgiving and take some time to not only recognize what it is you're thankful for, but to share it with others and let those special people in your life know how blessed you are to have them.


{Shout out} to Chappy, Mama, Gram, Baby Sis, Pants & Hubs.  I'm thankful for you every day!
And remember...calories don't count when you're with family!  ;)http://littlemissglamourgoestokindergarten.blogspot.com/2011/11/gobble-gobble.html

gobble gobble.

Does anyone have all of next week off for Thanksgiving?  Or are you all with me in a super short week?  We're in session on Monday and Tuesday so I'll be posting later about our upcoming {theme days!}  For now, here are some of my favorite turkey ideas to help you count down to holiday break!

{pattern turkeys}
I found this turkey online somewhere {not my creation!} and made it into a double page for the kids to show 2 different types of patterns.  They still don't understand that they only have to write the rule once, but as long as the letters are right, I don't really put up a fuss about it.  :)
The cut-out turkeys are also a coloring sheet that I had the kids use in a pattern center to create another type of turkey pattern to decorate our cubbies.
We also created Surrounding Patterns {from the inside out} by putting feathers on a turkey body.  We glued down diecut pattern blocks but you could also used colored pasta or just draw the shapes.  P.S. If you really want to give your kids a giggle, tell them they have to help the turkeys so they're not naked!  Click for your very own {naked turkey}.  Disclaimer: not my creation, just a coloring page with erased feathers!


{turkey recipe}
I attempted writing a recipe for turkeys but have to honestly say that this activity is a little complex for most kindergarteners even when given the choice to write about any Thanksgiving food...since mashed potatoes, stuffing or pumpkin pie would require a larger choice of ingredients and cooking steps.  I realized that a few years ago when I first tried it but after seeing Erica Bohrer's cute turkey recipe card I thought I'd try it again.  {Note to self: use only as a challenge activity for a few kids next year!!}  Oh well.  Here it is if you're brave enough.  ;)


{turkey crowns}
Our cafeteria manager puts on a fabulous Thanksgiving luncheon every year for parents and the community to come attend and I figure if the school's all turkey'd out, we should be too!  My favorite turkey headbands:

{cut out 4-6 feathers of your color choice.  glue to the back of a sentence strip.}
 {flip the sentence strip over so the feathers stick out the back.}
 {glue a brown circle for the head}
 {fold over the tab of each wing and only glue down that section}
 {add a beak, eyes & snood}
 I didn't get a picture without faces in it so here's one of me from a few years ago.

{display turkeys with a touch of teaching}
I've always made these turkeys just to display and be festive but I'm really trying to focus on everything having an educational purpose so this year they received a make-over!
My highest kids created rhyming turkeys.  I was hoping they'd be able to come up with 6 real words but that was difficult for some of their words {their choice} so if we exhausted our minds and no one in the group {including me!} could come up with another real word I let them finish with nonsense.  The funniest part about that was seeing what pictures they came up with!

My middle groups created initial sound turkeys with 6 different words on the feathers.  I only accepted real words {and classmate names} for these because this is a skill we're really working on in both reading and writing.  They had to give me at least 3 examples before I wrote their letter.  If they couldn't, they had to think of a different letter before they began.
My lower group also created initial sound turkeys but only had to think of one or two words for each instead of trying to come up with 6 examples.  They were encouraged to use the pictorial alphabet on the word wall and I also had letter posters available for reference if they got stuck.
These are the letter posters our awesome EC teacher {Sara} made that the kids used for reference.  At first I was afraid that would make it too difficult but they had to tell me the word before adding it so that made them think and listen for the right sound.  {ex: on the Ss poster there was a smile and one of my girls had to work through and tell me why it had to be called smile and not mouth before she could add it.}
You could also make math turkeys with a number in the body and different ways to show the number on each feather...picture, number word, addition or subtraction equation, etc!

{cornucopia writing}
Okay, so I know this isn't a turkey but it is an awesome way to update a coloring page...so I'm pretty sure you won't mind!  Instead of listing things we're thankful for, color fruits or vegetables to be put in a cornucopia.  Cut them out and fold back the top of each fruit {I help with this} then glue down only that part to create a lift-the-flap type of picture.
 After they're glued down, the children write one thing they're thankful for under each fruit.
 Hang to display for an interactive bulletin board!  :)


Pilgrim & Native American activities will be posted tomorrow!!

Thursday, November 10, 2011

songs for phonics.

I really hope you have a SmartBoard or some sort of technology that allows you to use Smart Exchange.  I found a phonics file that I absolutely love!  It's called Jolly Songs and has a slide for each letter with a picture, lyrics and quick little tune to teach the sound.  Even my kids that already know their sounds have loved it and it's such a quick activity that I can work it in easily everytime we introduce a new sound without worrying about not sticking to my schedule!

At the beginning I kept it on the SmartBoard and used it in place of Daily News.  I let the kids come up to find capital and lowercase letters and sight words.
After doing it that way a few times I copied the files onto a Microsoft Word document and printed it out for Morning Work.  They actually like coming in and unpacking their bags to find these on their desks after turning over a new sound card {ImagineIt curriculum} the day before.  If they finish finding the letters and sight words they list words beginning with that sound at the bottom.  Words copied from the room are just as accepted as originally spelled words to keep everyone accountable to their current capabilities.

Wednesday, November 09, 2011

fall math.

Our math curriculum {Investigations} spends a lot of time on measurement and comparison in the first quarter.  While it offers a lot of games and activities, sometimes a kid just needs a change...er, a teacher just needs a creative outlet?!

{measurement}

I took a measurement sheet from a teammate and then {my favorite} extended it to build a great discussion.  The worksheet had the students measure various objects in the room {a piece of string, the stapler, a pencil, their hands, etc} and record how many caterpillars long it was.
But then the discussion started...  Why was your pencil only 5 caterpillars if his was 6?  Did someone do it wrong?  What does it mean?  Why would it be shorter?  Well why was your hand 4 cubes if hers is only 2?  How did you measure?  What does that mean?  Why are the answers different?

Their discussion was so good that I couldn't help but record it and hang their statements up with their work samples.  Way to think Kinders!

And of course we couldn't let measurement go by without measuring something fall-ish!  After they were proud of themselves for being smarter than me ;) in the previous discussion, I tried 'em again to see if they could explain their strategies {and different answers} by making the tool the variable.  They all measured the same pumpkin lengths but got to choose one of three tools and were only given at a time instead of lining them up to count!

{comparison}

We made towers of 10 and hunted around the room for things that were longer or shorter than our tower.  The second time we played we recorded in 3 columns and included things that were equal.  They drew a picture of the item and labeled it {for a challenge}.


Another favorite game is a spin off of an old Math Their Way game.  We call it Stack Tell Roll & Win. Sounds complicated.  But it's not.  And the kids love it!

Stack a tower of 10.  Put it behind your back and break it into 2.  Choose a piece to bring forward and show your partner.

Tell whose has more/less.  "I have more."  "I have less."  Roll the dice.  If it lands on L, the person with less takes all the cubes to add to their tower.  {If it lands on M the person with more takes all the cubes.}  Keep playing until one person has all 20 cubes.

 After reading Chrysanthemum by Kevin Henkes, we decided to see how long our names were!
Count the letters in a friend's name.  Take one cube for each letter.  Make a tower to count and double check.  Repeat with a second name.  Tell whose is longer and shorter!

Again with fall, we made spider webs crawling with spiders.  The amount was up to the kids {BUT!} one had to have more and one had to have less.  I extended it to have the students write a sentence or two.
Blogging tips