Friday, October 14, 2011

pattern parade.


A little fun on a Friday.

Our current ImagineIt {literacy} unit is on, you guessed it, patterns!  Or, as every year old I've ever met likes to say it...pat-er-ins.  So we decided that today we would all wear patterns to school and have a pattern parade!  Yes, we did march through every other kindergarten class showing off our patterns and doing our cheer.  But we had so much fun we just had to do it again {and again and again} back in our own classroom!  It was the end of the day on a Friday and they were having a blast so, hey...why not?!  :)

My apologies in advance for the volume & awesome quality of my voice!!

Tuesday, October 11, 2011

name game.

Who's not always looking for a quick and easy activity?  Here's two you can use in small groups or the kids can work independently in a center or as a whole group lesson!

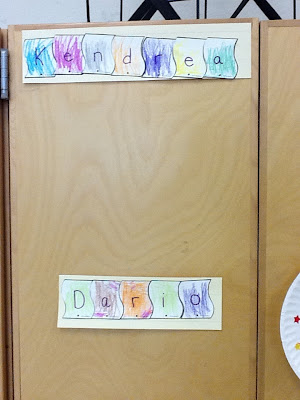
Puzzle names: We got the template for these in a Mailbox magazine so I don't have an electronic copy, but you could easily make puzzle pieces by either cutting a strip of paper into sections or by using Microsoft Word's auto shapes to create the template.  {there is a dot at the bottom of each piece to help students know which way is up}

Write the student's name with one letter on each piece.  Put in a ziplock mixed up so when students pull them out they have to reorder the letters to properly spell their names.  Teach lesson on using a capital only at the beginning and writing the rest with lowercase.  {can someone tell me...why is it that pre-schools always teach kids to write in ONLY CAPS?!}

Option A: students glue to a sentence strip to be hung as a cubby/table nametag.

Option B: put puzzle pieces back in the back and add all student names to a basket.  Voila!  Instant alphabet center.

Letter Cover-Up:  Write each student's name on a paper plate.  Write remaining letters of the alphabet all over the plate but do not duplicate the letters in the child's name.  Instruct the students that there is a secret message hiding on their plate but they have to make certain letters go away to see it.  They look at the letters and if it is not a letter in their name, they cover it up with a sticker to make it go away!  If they finish correctly their name will appear!

Differentiation: Use only capitals, only lowercase or a combination of both depending on what the child is working on.  For students with little to no letter recognition {including their names} write the letters in their name a little larger than the others.  Give students a nametag or other written representation of their name to double-check each letter.  To extend, write student name randomly on the plate instead of in a straight line.

Sunday, October 09, 2011

an animated alphabet.

This may be a little much for my kinders if I try to explain every new word as vocabulary {anamorphosis?!}, but if they just want to sit and watch the alphabet be animated, they'll probably get a kick out of this.  Watch for D...it's sure to be a favorite.  ;)


Tuesday, October 04, 2011

Growin' crops on the farm

I. love. the. farm.  So much so that we're extending our Social Studies curriculum to teach "On the Farm" for 2 weeks {who can do it in only two 45 minute lessons?!} plus doing fall leaves, apples and pumpkins separately in science from pretty much now to November.  :)

We used Shannon's farm circle map to record what we saw on the farm as we watched Let's Explore: Around the Farm on Discovery Education.


We, of course, had to learn about baby animals and the various animal types so we made a farm book to tell each name.  {click for file.}  Farm Animals: A first look was another great Discovery Ed video to give us the information before we recorded it in our books!  Enchanted Learning also has a list of female/male/baby animal names but BE WARNED: the female dog is listed as a B*.  Thankful today that my kids can't read yet since I pulled it up on the SmartBoard!!!!  We just called both adult dogs "dogs."  LOL


I also made a Farmer, Farmer, What do you see? book based on Bill Martin.  Students fill in sight words I, see, a & me as they read the predictive text to practice colors, one-to-one correspondence and sight words.  {click the pic for the file!}


I'm all over the animals and apples and pumpkins {coming soon!} but realized that I never really did a great job of teaching the crops and produce that come from a farm in the past!  So after seeing Kinder by Kim's garden unit, we decided to spice it up a little bit by learning about crops.  If you haven't read it, Tops and Bottoms by Janet Stevens is a GREAT place to start!


We created the above bulletin board after reading the story and categorizing crops by how they grow and what part we eat.  I got pictures from the internet and the writing structure says ____ is a _____ I can eat.  {click for the file}  We added a little something extra to everything to jazz it up:

The apples got glitter for shine.  The tomato got a tissue paper stem.  The peapods got pom pom peas stuck inside.  The celery got green yarn for strings.  The potatoes got googly eyes for eyes.  {yes, I know this is totally inaccurate but I just couldn't help myself!}  The lettuce got glitter for some leaf depth.  The carrots got orange pipe cleaner ridges and the corn got tissue paper husks.


And what's a great garden without a scarecrow to protect the crops?!  We completed this scarecrow glyph {click the pic} to tell all about our favorite things of fall.  You'll notice the drawn crops and popsicle stick post.  ;)  I might blow it up next year to make it a little bigger because some of my kids had a hard time cutting out the small pieces but I think it's still cute!

How do YOU celebrate the farm???  :)
Blogging tips