Wednesday, November 09, 2011

apples & pumpkins {and leaves & candy corn...}

I love fall!  Apples, pumpkins, Halloween, Thanksgiving, sweaters, random warm days, bonfires, cider, hayrides, corn mazes...I love it all.  So {of course!} I have to bring it into the classroom as well!  As my entire team loves this time of year, we incorporate fall things into just about everything from September through November.  :)  Rather than repeating similar activities that you've already shared or seen elsewhere, I thought I'd pick just a few to showcase that might hopefully be new or inspire you to make a change to an old favorite.

{apples}

We started by just using the five senses to see what we could learn from the apples themselves.  I wish I could put up pictures of my kids because they were so funny with the apples right up to their eyes, smelling them intensely and listening so closely I'm surprised no one walked away with a bruised ear!  We used their observations to record in an apple journal that I hung on their cubbies to double as nametags.


We had an apple tasting after learning all about how they grow and what products can be made from them.  I had my students label the parts as I was getting out all of their snacks.  I love a science journal...shows so much info at the end of the year! {Like if you need evidence for a teaching evaluation or some such thing...hint hint!}


{pumpkins}

We do the same experiments that many of you do but I like to have the kids write in another journal instead of circling answers on a worksheet.  {not that it's bad - don't send hate mail!}  We estimated and double checked how many grooves were on the pumpkin, how much it weighed, how many seeds were inside, how big around it was {using yarn} and if it would sink or float.

While they thought about which jack-o-lantern face to put on the front, we used the SmartBoard to see all of the different options available.

Then we pulled out the seeds to count while also separating the seeds from the guts.  {I mean, come on, you can't be technical with everything.  yuck!}

We had sugar overload from our pumpkin tasting!!

{leaves}

We like to send family homework projects every so often and in fall we always use the Leaf Man by Lois Ehlert to get the ball rolling.  Students are sent with directions and a piece of paper {and a bag of leaves from the school grounds if requested by the parent} for their projects.  I often get a lot of leaf people back but was really pleased with this year's variety!


leaf Rapunzel

leaf dog

leaf snake
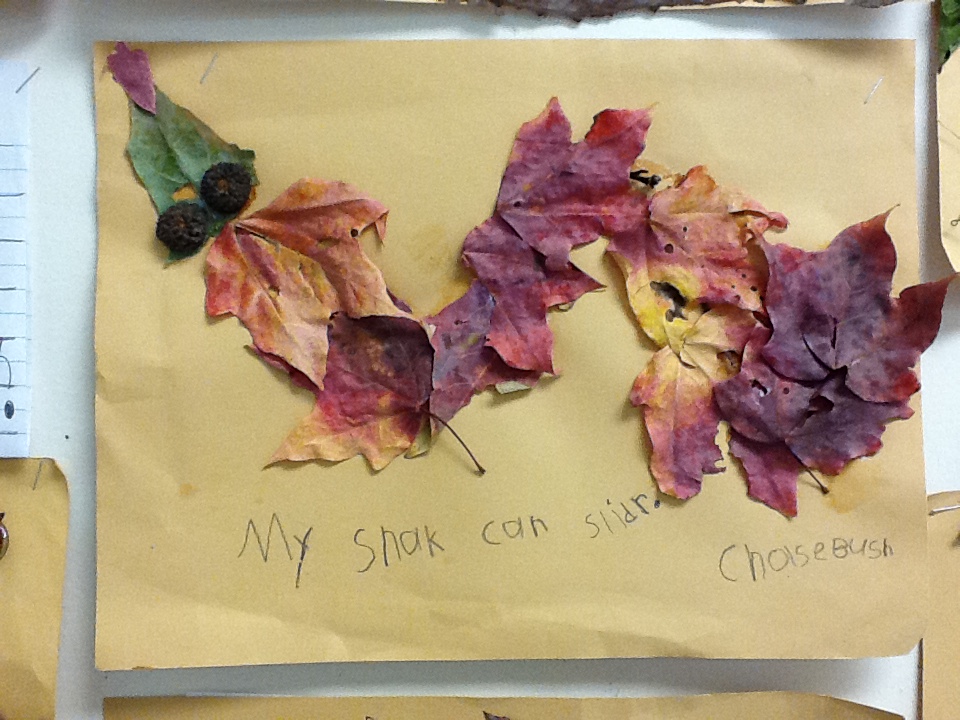

{candy corn}
How did I forget about one of my favorite fall things?!  I love the story The little old lady who was not afraid of anything by Linda Williams because I always teach my kids to act out the story as I read {when the shirt shake, shakes and the pants wiggle, wiggle...}  But to work on story sequencing and making predictions I started to retell this story on candy corn outlines!  I only read up to the part when the little old lady goes to answer the door then I stop and do this activity.
The top of the candy corn is the beginning when she goes for a walk.  The middle is the middle where she encounters all of the parts in the forest.  Then they predict what she'll see on the other side of the door by drawing a picture {and writing if able} on the bottom of the candy corn.  Once everyone has made their predictions we read the story again from the beginning {to do the fun motions} and check our prediction to see if anyone was correct!

It's always a favorite.  Hope you enjoy!

Saturday, November 05, 2011

Bubble maps. {and the problem with Huxtable}

Hopefully you're familiar with using Thinking Maps as graphic organizers.  I know I've mentioned them before because they're great!  We most often use Circle Maps and Tree Maps in kindergarten but are well-acquainted with the others as well.  Last week I decided to teach the Bubble Map as I introduced our new friend...
Huxtable!


That's right!  We finally got our puppy!!!  :)  His name is Huxtable {after the greatest show ever} and my parents decided to get his sister, Betty.  They are Shih-poos and were 8 weeks old when we picked them up.  I am in heaven...unless that's just sleep deprived delusion.  Still working through that one.

Since I had to miss a day of school to drive down and pick him up from the breeder I figured we could use that in the next day's lesson.  Building on interest and all, right?  ;)  So we created a Bubble Map together on the SmartBoard to describe Huxtable.  They looked at pictures of him {because he hasn't had all of his shots yet} and came up with their own words.


The next day they used their Bubble Maps to draw a picture and complete "Huxtable is ____." sentences.  


I challenged my higher kids to then come up with their own additional sentences. 


So between not sleeping full nights {he isn't really sure of the difference between a nap and a full night's sleep} and wanting to do nothing but snuggle him when I get home, I've been MIA.  But I  have pictures ready for apples, pumpkins, measurement, comparing amounts, letter sounds and literacy ideas.    Late is better than never, right?!  Coming {relatively} soon.  ;)  Thanks for sticking with us!!

Friday, October 14, 2011

pattern parade.


A little fun on a Friday.

Our current ImagineIt {literacy} unit is on, you guessed it, patterns!  Or, as every year old I've ever met likes to say it...pat-er-ins.  So we decided that today we would all wear patterns to school and have a pattern parade!  Yes, we did march through every other kindergarten class showing off our patterns and doing our cheer.  But we had so much fun we just had to do it again {and again and again} back in our own classroom!  It was the end of the day on a Friday and they were having a blast so, hey...why not?!  :)

My apologies in advance for the volume & awesome quality of my voice!!

Tuesday, October 11, 2011

name game.

Who's not always looking for a quick and easy activity?  Here's two you can use in small groups or the kids can work independently in a center or as a whole group lesson!

Puzzle names: We got the template for these in a Mailbox magazine so I don't have an electronic copy, but you could easily make puzzle pieces by either cutting a strip of paper into sections or by using Microsoft Word's auto shapes to create the template.  {there is a dot at the bottom of each piece to help students know which way is up}

Write the student's name with one letter on each piece.  Put in a ziplock mixed up so when students pull them out they have to reorder the letters to properly spell their names.  Teach lesson on using a capital only at the beginning and writing the rest with lowercase.  {can someone tell me...why is it that pre-schools always teach kids to write in ONLY CAPS?!}

Option A: students glue to a sentence strip to be hung as a cubby/table nametag.

Option B: put puzzle pieces back in the back and add all student names to a basket.  Voila!  Instant alphabet center.

Letter Cover-Up:  Write each student's name on a paper plate.  Write remaining letters of the alphabet all over the plate but do not duplicate the letters in the child's name.  Instruct the students that there is a secret message hiding on their plate but they have to make certain letters go away to see it.  They look at the letters and if it is not a letter in their name, they cover it up with a sticker to make it go away!  If they finish correctly their name will appear!

Differentiation: Use only capitals, only lowercase or a combination of both depending on what the child is working on.  For students with little to no letter recognition {including their names} write the letters in their name a little larger than the others.  Give students a nametag or other written representation of their name to double-check each letter.  To extend, write student name randomly on the plate instead of in a straight line.

Sunday, October 09, 2011

an animated alphabet.

This may be a little much for my kinders if I try to explain every new word as vocabulary {anamorphosis?!}, but if they just want to sit and watch the alphabet be animated, they'll probably get a kick out of this.  Watch for D...it's sure to be a favorite.  ;)


Tuesday, October 04, 2011

Growin' crops on the farm

I. love. the. farm.  So much so that we're extending our Social Studies curriculum to teach "On the Farm" for 2 weeks {who can do it in only two 45 minute lessons?!} plus doing fall leaves, apples and pumpkins separately in science from pretty much now to November.  :)

We used Shannon's farm circle map to record what we saw on the farm as we watched Let's Explore: Around the Farm on Discovery Education.


We, of course, had to learn about baby animals and the various animal types so we made a farm book to tell each name.  {click for file.}  Farm Animals: A first look was another great Discovery Ed video to give us the information before we recorded it in our books!  Enchanted Learning also has a list of female/male/baby animal names but BE WARNED: the female dog is listed as a B*.  Thankful today that my kids can't read yet since I pulled it up on the SmartBoard!!!!  We just called both adult dogs "dogs."  LOL


I also made a Farmer, Farmer, What do you see? book based on Bill Martin.  Students fill in sight words I, see, a & me as they read the predictive text to practice colors, one-to-one correspondence and sight words.  {click the pic for the file!}


I'm all over the animals and apples and pumpkins {coming soon!} but realized that I never really did a great job of teaching the crops and produce that come from a farm in the past!  So after seeing Kinder by Kim's garden unit, we decided to spice it up a little bit by learning about crops.  If you haven't read it, Tops and Bottoms by Janet Stevens is a GREAT place to start!


We created the above bulletin board after reading the story and categorizing crops by how they grow and what part we eat.  I got pictures from the internet and the writing structure says ____ is a _____ I can eat.  {click for the file}  We added a little something extra to everything to jazz it up:

The apples got glitter for shine.  The tomato got a tissue paper stem.  The peapods got pom pom peas stuck inside.  The celery got green yarn for strings.  The potatoes got googly eyes for eyes.  {yes, I know this is totally inaccurate but I just couldn't help myself!}  The lettuce got glitter for some leaf depth.  The carrots got orange pipe cleaner ridges and the corn got tissue paper husks.


And what's a great garden without a scarecrow to protect the crops?!  We completed this scarecrow glyph {click the pic} to tell all about our favorite things of fall.  You'll notice the drawn crops and popsicle stick post.  ;)  I might blow it up next year to make it a little bigger because some of my kids had a hard time cutting out the small pieces but I think it's still cute!

How do YOU celebrate the farm???  :)

Wednesday, September 28, 2011

It looked like spilt milk.

I'm not sure if it's Common Core or Essential Standards {is anyone else confused switching back and forth?!} or just the fact that we've hired a full-time Science Lab teacher this year {who is amazing!} but our science concepts have changed immensely this year.  Technically we are only teaching 4 concepts, 1 per quarter...weather, measurement, animals & tools.  Well, that leaves a lot to be desired so while we're continue to explore those concepts in the Science Lab, we're definitely pulling out some of the oldies-but-goodies to teach more in the classroom.

For our quarter one objective of weather, we combined our knowledge of clouds and rain to make this little display in the hallway:


After reading It looked like spilt milk by Charles G. Shaw, we tore up pieces of white paper to create our own cloud pictures.  In the past when I've read this book, our follow-up has been to squirt some white paint on the blue paper, fold it in half, smooth the paper around and open it to find a symmetrical white shape but my kinders had a hard time {year after year} trying to figure out what that white blob looked like.  I'm super happy about how the paper tearing worked out this year.  I modeled by gluing my pieces down in a high heel shape {which, of course, they recognized!} and then made their own.  I will definitely be using this follow-up from now on.

I typed a sentence structure into a cloud modeled after the story so the students could tell me what their cloud picture was and I extended it to add somewhat of a pre-assessment piece when I asked students to predict what clouds are made of.  The next week when we learned more about clouds and rain, we wrote various facts and students chose on to write on their raindrop.  Complete with blue glitter...of course.  ;)

Here's two examples:


If you'd like my cloud outline, click the pic below!
{yes, it's just a speech bubble and I didn't cut out the thinking parts}


We're now taking a break from weather to introduce {my favorite!} all things fall...coming soon!!!


Blogging tips